How to Make Red Velvet Brownies with Cream Cheese Frosting
If you’re on the hunt for a dessert that strikes the perfect balance between rich chocolate flavor and tangy cream cheese sweetness, let me introduce you to Red Velvet Brownies with Cream Cheese Frosting. This indulgent treat combines the fudgy texture of brownies with the beloved red velvet cake’s vibrant color and subtle cocoa flavor, finished off with a luscious, creamy frosting that melts in your mouth. Whether for a special occasion or a cozy night in, these brownies are sure to win hearts and elevate any dessert spread.
Why You’ll Love This Recipe
- Ultimate texture combo: Fudgy brownies meet the soft, velvety crumb of red velvet for an irresistible bite.
- Vibrant color: The classic red hue adds a festive pop that makes these brownies as stunning as they are delicious.
- Perfectly tangy frosting: Cream cheese frosting balances sweetness with a subtle tang for a luscious finish.
- Simple ingredients: Pantry staples come together effortlessly, making this an accessible bake for all skill levels.
- Versatile treat: Ideal for parties, gifts, or an everyday indulgence that never gets old.
Ingredients You’ll Need
The magic of Red Velvet Brownies with Cream Cheese Frosting lies in its simple yet essential ingredients. Each component plays a critical role, from creating that signature color and subtle cocoa undertone to achieving the smooth, creamy texture of the frosting.
- All-purpose flour: Provides the structure needed for a chewy, fudgy brownie base.
- Cocoa powder: Adds depth with a mild chocolate flavor that’s never overpowering.
- Granulated sugar: Sweetens the brownies while keeping them moist and tender.
- Unsalted butter: Adds richness and helps achieve that melt-in-your-mouth texture.
- Eggs: Bind everything together and contribute to the dense brownie consistency.
- Buttermilk: Enhances the red velvet flavor and helps tenderize the batter.
- Vanilla extract: Boosts the overall aroma and flavor complexity.
- Red food coloring: The signature red that makes these brownies truly eye-catching.
- Baking powder: Helps the brownies rise just enough without losing their fudgy feel.
- Salt: Balances the sweetness and intensifies the chocolate notes.
- Cream cheese: The star of the frosting, delivering a tangy, creamy finish.
- Powdered sugar: Sweetens the frosting smoothly without grit.
- Butter (for frosting): Adds richness and smoothness to the cream cheese frosting.
- Lemon juice or vanilla extract (optional for frosting): A little extra zing to brighten the frosting.
Variations for Red Velvet Brownies with Cream Cheese Frosting
Red Velvet Brownies with Cream Cheese Frosting are wonderfully flexible. You can tweak this recipe to suit dietary preferences, ingredient availability, or personal taste without sacrificing any of the deliciousness.
- Gluten-free version: Swap all-purpose flour for a gluten-free blend to keep things chewy and crumbly without gluten.
- Vegan adaptation: Use dairy-free cream cheese, plant-based butter, and a flax or chia egg replacement for a compassionate twist.
- Nutty surprise: Add chopped pecans or walnuts for a delightful crunch that pairs perfectly with the creamy frosting.
- Chocolate swirl: Incorporate swirls of melted dark chocolate into the brownie batter for extra richness.
- Spicy hint: Introduce a pinch of cinnamon or cayenne for those who like a little warmth alongside sweet.

How to Make Red Velvet Brownies with Cream Cheese Frosting
Step 1: Prepare Your Pan and Ingredients
Start by preheating your oven to 350°F (175°C). Grease a 9×9 inch baking pan or line it with parchment paper for easy removal. Gather all ingredients measured out to ensure smooth prep from start to finish.
Step 2: Mix the Dry Ingredients
In a medium bowl, whisk together the all-purpose flour, cocoa powder, baking powder, and salt. This ensures even distribution for a consistent crumb and balanced flavor throughout your brownies.
Step 3: Cream Butter and Sugar
In a large bowl, beat the unsalted butter and granulated sugar until light and fluffy. This step is key to incorporating air and achieving a tender texture.
Step 4: Add Eggs and Flavorings
Beat in eggs one at a time, mixing well after each addition. Then stir in vanilla extract and red food coloring until the mixture turns a vibrant red.
Step 5: Combine Wet and Dry Ingredients
Alternately add the dry mixture and buttermilk to the butter mixture, starting and ending with dry ingredients. Mix gently until just combined — overmixing can cause a tough brownie.
Step 6: Bake the Brownies
Pour the batter into your prepared pan, smoothing the top with a spatula. Bake for 25-30 minutes, or until a toothpick inserted near the center comes out with a few moist crumbs.
Step 7: Make the Cream Cheese Frosting
While brownies cool completely, beat softened cream cheese with butter until smooth. Gradually add powdered sugar and vanilla extract, then beat until fluffy and creamy.
Step 8: Frost and Serve
Spread the cream cheese frosting evenly over cooled brownies. Chill briefly in the fridge if you want the frosting to firm up before slicing. Cut into squares and enjoy!
Pro Tips for Making Red Velvet Brownies with Cream Cheese Frosting
- Use full-fat cream cheese: It ensures the frosting stays smooth and thick rather than runny or grainy.
- Don’t overbake: Pull the brownies out when a toothpick shows moist crumbs to keep them fudgy and soft.
- Room temperature ingredients: Results in better mixing and improved texture throughout.
- Color tips: Gel food coloring provides a more vivid red without thinning the batter.
- Chill before cutting: Cooling the brownies in the fridge after frosting helps achieve neat slices.
How to Serve Red Velvet Brownies with Cream Cheese Frosting
Garnishes
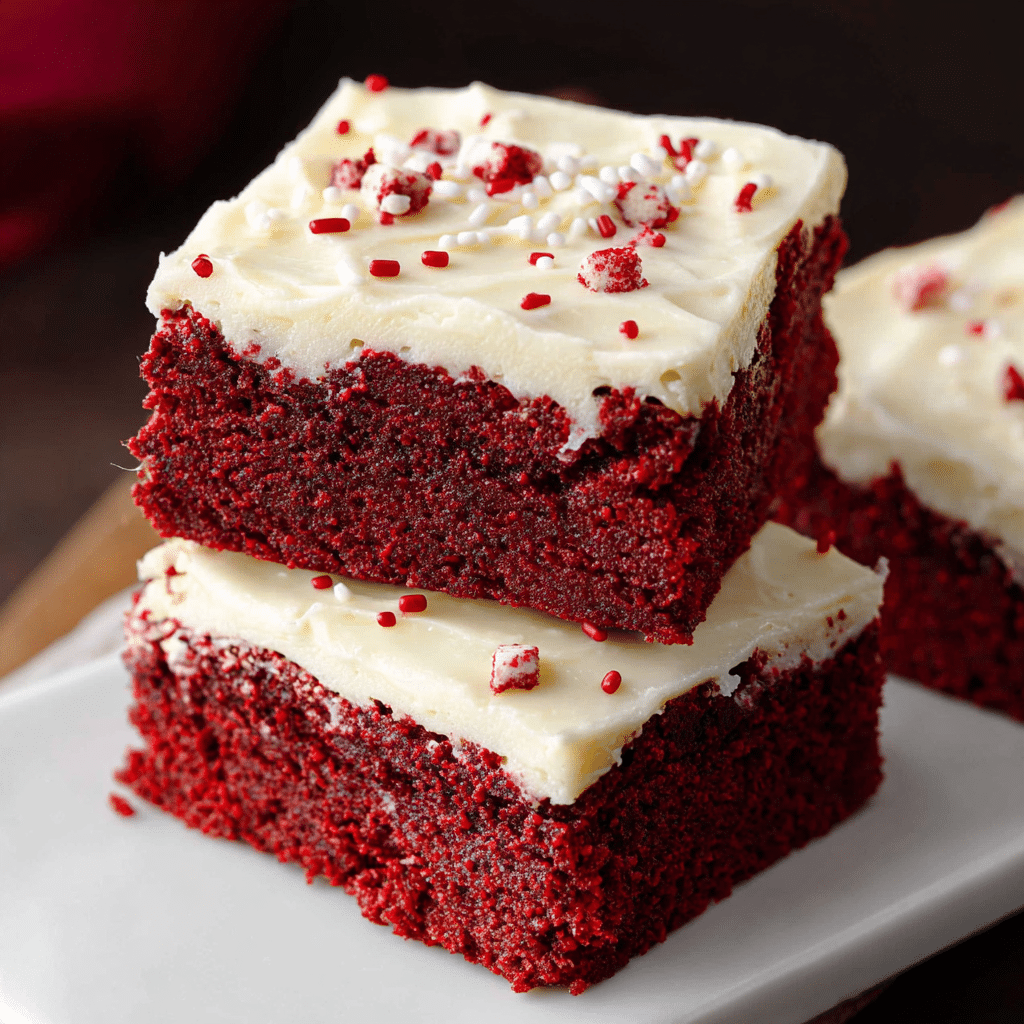
Sprinkle a few festive red or white sprinkles for extra charm or shave some dark chocolate on top of the frosting to add texture and a bittersweet contrast.
Side Dishes
Pair these brownies with a scoop of vanilla ice cream, fresh berries, or a cup of rich coffee to enhance and balance the dessert experience.
Creative Ways to Present
Serve brownies in small mason jars layered with whipped cream or crumble them over cheesecake for a playful dessert mashup. You can also cut them into mini bites for party platters.
Make Ahead and Storage
Storing Leftovers
Store brownies in an airtight container at room temperature for up to three days to keep them moist, or refrigerate for up to a week if you prefer a chilled treat.
Freezing
Wrap brownies tightly in plastic wrap and then foil to freeze for up to 3 months. Thaw overnight in the fridge before frosting and serving for best results.
Reheating
Warm brownies gently in the microwave for 10-15 seconds or in a low oven to revive their softness without melting the frosting.
FAQs
Can I make these brownies dairy-free?
Yes! Simply substitute dairy butter and cream cheese with plant-based alternatives and use a non-dairy milk in place of buttermilk to make a delicious dairy-free version.
Is it possible to use natural food coloring?
Natural colorings like beet juice can be used, but the vibrant red tone may be softer, and the flavor might be slightly altered.
How do I know when the brownies are done?
Insert a toothpick into the center; if it comes out with moist crumbs but no wet batter, your brownies are perfectly baked.
Can I make the frosting ahead of time?
Absolutely! Prepare the cream cheese frosting a day in advance and keep it refrigerated. Bring it to room temperature and whisk before spreading.
What’s the best way to cut these brownies cleanly?
Use a sharp knife warmed in hot water and wiped dry to slice through the frosting and brownie layers smoothly without tearing.
Final Thoughts
Red Velvet Brownies with Cream Cheese Frosting are a delightful treat that combines the best of both worlds: fudgy brownie goodness and the classic charm of red velvet. Once you try this recipe, it’ll quickly become a staple for celebrations or whenever you simply crave a cozy, irresistible dessert. So go ahead, bake a batch and share the love—these brownies truly bring smiles all around!
Related Posts
- Why Apple Fritter Cake Is Perfect for Fall
- Why Try This Creamy Filled Pumpkin Roll Today?
- Why Strawberry Cream Pie To Die For Is Irresistible
Red Velvet Brownies with Cream Cheese Frosting

Red Velvet Brownies with Cream Cheese Frosting combine the rich, fudgy texture of classic brownies with the vibrant color and subtle cocoa flavor of red velvet cake, topped with a luscious, tangy cream cheese frosting. Perfect for special occasions or cozy nights in, these brownies offer an irresistible balance of chocolate and tangy sweetness with simple ingredients and an accessible baking process.
- Prep Time: 15 minutes
- Cook Time: 25-30 minutes
- Total Time: 40-45 minutes
- Yield: 16 brownies (9x9 inch pan) 1x
- Category: Desserts
- Method: Baking
- Cuisine: American
- Diet: Vegetarian
Ingredients
Brownie Ingredients
- 1 cup all-purpose flour
- 2 tablespoons cocoa powder
- 1/2 teaspoon baking powder
- 1/4 teaspoon salt
- 1/2 cup unsalted butter, softened
- 1 cup granulated sugar
- 2 large eggs
- 1/4 cup buttermilk
- 1 teaspoon vanilla extract
- 1 tablespoon red food coloring (gel recommended)
Cream Cheese Frosting Ingredients
- 8 ounces cream cheese, softened (full-fat recommended)
- 1/4 cup unsalted butter, softened
- 2 cups powdered sugar
- 1 teaspoon vanilla extract
- Optional: 1 teaspoon lemon juice or additional vanilla extract for extra zing
Instructions
- Prepare Your Pan and Ingredients: Preheat your oven to 350°F (175°C). Grease a 9×9 inch baking pan or line it with parchment paper for easy removal. Measure out all the ingredients to ensure smooth preparation.
- Mix the Dry Ingredients: In a medium bowl, whisk together the all-purpose flour, cocoa powder, baking powder, and salt to ensure even distribution and balanced flavor throughout the brownies.
- Cream Butter and Sugar: In a large bowl, beat the softened unsalted butter and granulated sugar until light and fluffy, incorporating air for a tender texture.
- Add Eggs and Flavorings: Beat in eggs one at a time, mixing well after each addition. Stir in the vanilla extract and red food coloring until the mixture turns a vibrant red color.
- Combine Wet and Dry Ingredients: Alternately add the dry ingredient mixture and buttermilk to the butter mixture, starting and ending with dry ingredients. Mix gently until just combined to avoid overmixing and tough brownies.
- Bake the Brownies: Pour the batter into the prepared pan and smooth the top with a spatula. Bake for 25-30 minutes, or until a toothpick inserted near the center comes out with a few moist crumbs.
- Make the Cream Cheese Frosting: While brownies cool completely, beat the softened cream cheese and butter together until smooth. Gradually add powdered sugar and vanilla extract, then beat until the frosting is fluffy and creamy. Add lemon juice or extra vanilla if desired.
- Frost and Serve: Spread the cream cheese frosting evenly over cooled brownies. Chill briefly in the fridge if you want the frosting to firm up before slicing. Cut into squares and enjoy!
Notes
- Use full-fat cream cheese for a smooth, thick frosting that doesn’t turn runny or grainy.
- Do not overbake the brownies; a toothpick should come out with moist crumbs to keep them fudgy.
- Using room temperature ingredients helps achieve better mixing and improved texture.
- Gel food coloring provides a more vivid red without thinning the batter.
- Chill brownies after frosting to enable neat, clean slices.
Nutrition
- Serving Size: 1 brownie (1/16th of recipe)
- Calories: 280
- Sugar: 28g
- Sodium: 150mg
- Fat: 16g
- Saturated Fat: 9g
- Unsaturated Fat: 6g
- Trans Fat: 0g
- Carbohydrates: 33g
- Fiber: 1g
- Protein: 3g
- Cholesterol: 55mg
Keywords: red velvet brownies, cream cheese frosting, red velvet dessert, fudgy brownies, chocolate brownies, easy dessert